Mastering the Art Brother DCP-L2550DW Toner Replacement Guide is a great choice for your guide’s title. It conveys a sense of expertise and skill in the toner replacement process, making it appealing to readers who want to become proficient in maintaining their printer.

This title suggests that your guide will provide in-depth knowledge and tips for successful toner replacement with the Brother DCP-L2550DW printer.Replacing the toner cartridge in a Brother DCP-L2550DW printer is a straightforward process. Here’s a step-by-step guide on how to do it, along with some recommendations for replacement cartridges and cost-saving tips:
Mastering the Art Brother DCP-L2550DW Toner Replacement Guide
Step 1: Prepare the Printer
Make sure your Brother DCP-L2550DW printer is turned on and in a ready state. You should see the printer’s status light as steady green or ready to print.
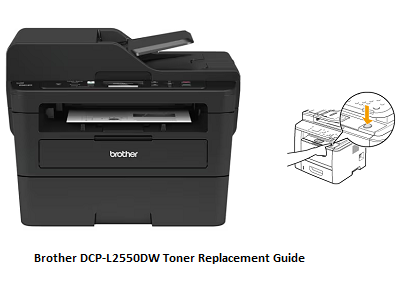
Step 2: Open the Printer Cover
Lift the scanner cover to access the toner cartridge area. The cover is hinged at the back of the printer.
Step 3: Remove the Old Toner Cartridge
Inside the printer, you will find the toner cartridge and drum unit assembly. The toner cartridge is the smaller, removable part, To remove it, follow these steps:
- Hold the green lever on the toner cartridge and drum unit assembly and lift the toner cartridge out.
Next, Place the old toner cartridge Printer aside for recycling or disposal following local regulations.
Next, Step 4: Prepare the New Toner Cartridge
- Before inserting the new toner cartridge, you should gently shake it from side to side to distribute the toner evenly inside the cartridge, Next This ensures optimal print quality.
Step 5: Insert the New Toner Cartridge
- Remove the protective cover or seal from the new toner cartridge.
- Insert the new toner cartridge into the drum unit assembly, aligning it with the grooves and making
- sure it clicks into place securely.
- Next, Brother DCP-L2550DW Close the printer cover.
Step 6: Reset the Toner Counter
After replacing the toner cartridge, you may need to reset the toner counter to ensure accurate monitoring of toner levels. Here’s how you can do it:
- Press the “Settings” button on your printer’s control panel.
- Use the arrow keys to navigate to the “Machine Info” menu and press “OK.”
- Select “Reset Menu” and press “OK.”
- Choose “TNR-STD” (standard toner cartridge) or “TNR-HC” (high-yield toner cartridge) depending on the type of cartridge you installed.
- Press “OK” to reset the counter.
Recommended Replacement Cartridges:
For the Brother DCP-L2550DW, Brother offers compatible toner cartridges that are designed to work seamlessly with your printer. The specific cartridge you need may vary depending on your region and the availability of cartridges, but you can typically find standard yield (TN-730) and high-yield (TN-760) cartridges.
Cost-Saving Tips:
- Buy High-Yield Cartridges: High-yield cartridges generally offer better value because they contain more toner and last longer than standard yield cartridges.
- Consider Third-Party Cartridges: While Brother’s own cartridges are known for their quality, you can explore reputable third-party brands that offer compatible and more affordable alternatives. Just be sure to choose a trusted supplier to ensure quality.
- Recycle Old Cartridges: Many office supply stores and manufacturers offer recycling programs for empty toner cartridges. Recycling not only benefits the environment but can also earn you rewards or discounts on future purchases.
- Use Toner-Saving Mode: When printing documents that don’t require high-quality output, use the printer’s toner-saving mode to extend the life of your cartridge.
By following these steps and considering cost-saving tips, you can efficiently replace the toner cartridge in your Brother DCP-L2550DW printer while managing costs effectively.


